Lightning Web Components (LWCs) are the new hot topic for Salesforce Developers.
But what if you are stuck in Classic?
I’ve been using Lightning Out with a Visualforce page to display what are now called Aura Components (the original Lightning Components).
But again, LWCs aren’t ready for Lightning Out.
Hmm… But you can call LWCs from Aura Components. So, you should be able to use Lightning Out with LWCs if you are willing to do a little setup and create a couple wrappers to get to the LWC.
Let’s dig in and have some fun with this.
This is going to live in Classic. Hence the need to find a different way to call LWCs. Here is our business case that we are solving for:
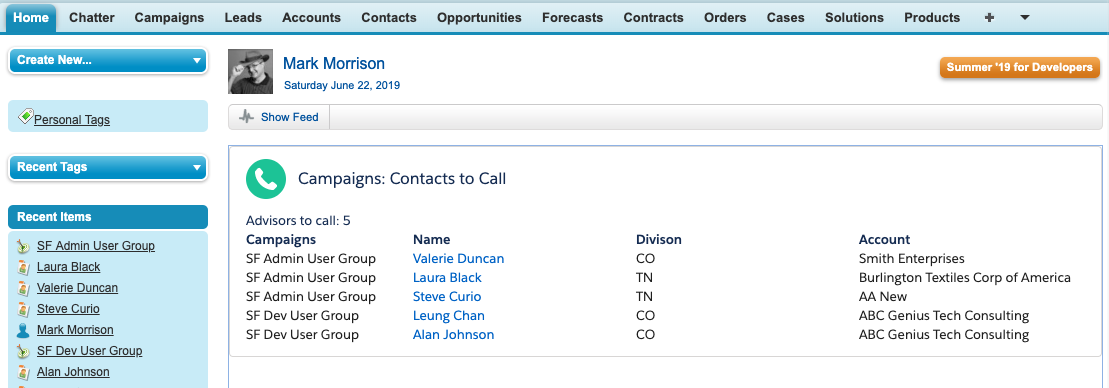
The sales team needs a list of contacts on their home page. Contacts should be in their division and assigned to the current active campaigns that are in progress so that they know which ones to call.
Here is what that means for us:
- It’s going on the Home Page so it will be a Home Page Component calling a Visualforce page
- The sales team division will come from User.Division
- We will show a list of Contacts where Contact.MailingState matches User.Division
- The Campaigns are current(StartDate-EndDate), active(IsActive), and in progress(Status = ‘In Progress’)
Sometimes it helps to visualize it:

When building in Salesforce it’s always a good idea to start building with the base, innermost item first. That way the item is already there, ready to be called from the item that is above it.
So here is our order of creation:
- Apex Controller Test
Yep, tests. Starting with tests helps you build good code among other things. - Apex Controller
We will get our data here and prep it for display. - LWC
Our view state and a Javascript controller - Aura App
This one is simple, you’ll see. - Visualforce page
Not too much here either. It will use Lightning and Javascript to call in the LWC through the Aura Component passing in a “name” variable along the way.
Apex Controller Test
CampaignContactsViewControllerTest

Apex Controller
CampaignContactsViewController

There are a few things going on here:
- Line 3 has the @AuraEnabled(cachable=true) annotation and we set the cachable=true so we can call it from the @wire decorator later. This also improves runtime performance.
- Line 6 gets the User Division that is running the page
- Line 8 takes the Division and removes blank spaces and splits the result of a comma-separated value into a List of Strings that we use in the SOQL below.
- Lines 11 – 21 create the SOQL that we use to get the CampaignMembers where their MailingState matches the Divisions and the Campaigns that are active, in progress, and current.
We have the innermost part of our solution completed.
LWC
campaignContactView.html

This is the HTML file for the LWC, the beginning of the view state:
- Line 2 has a title that uses a “name” variable that will be passed in from the Visualforce page.
- Line 4 uses an if:true to detect if we have anything in the “contacts” variable and if we do then display the template.
- Line 5 we display the number of contacts returned using the “contactLength” variable.
- Lines 13- 20 uses the for:each to iterate over the “contacts” and display the information we pass back from the Javascript controller.
- Line 23 is another if:true looking to display the “error” variable if we get one.
LWC
campaignContactView.js

This is where most of the magic happens… we connect to the Apex Controller and get data… manipulate and transform the data into a Javascript object for better control of the data returned to the view state… and insert it into the “contacts” variable:
- Line 1 imports the base LightningElement and includes the decorators for api, track, and wire.
- Line 2 imports the getCampaignMembers method from the CampaignContactsViewController Apex controller.
- Lines 5-8 set up the variables using the decorators. “name” uses the @api decorator so we can pass it in from the Visualforce page.
- Lines 10-33 uses the @wire decorator to call to the getMembers import and passes the result into the wiredGetMembers function.
- Line 12 we set up an array of members that we’ll push each member into
- Lines 13-28 takes the results and sets up a member object with the fields from the data returned for each campaignMember.
- Line 21 builds out the link for the Contact so it is easy to use in the view state.
- Lines 26-28 set the contacts, contactLength, and error variables.
- That’s a lot of bullet points just to describe the code.
Aura Component
CampaignContactsViewContainerApp

This is our entry point into Lightning Out and our first wrapper container. You could use an Aura Component but the App is easiest for this implementation. This is the only file we need and it is only three lines.
The access parameter needs to be set to GLOBAL and it has to extend Lighting Out with the ltng:outApp.
The important line is the aura:dependency that sets the resource to our LWC campaignContactsView using the “c” namespace.
That was quick.
Visualforce
CampaignContactsViewContainer

Our second and final wrapper container. This visualforce page has an empty div that Javascript will populate with our LWC.
- Line 2 “includeLightning” includes the Lightning Components for Visualforce JavaScript library, lightning.out.js, from the correct Salesforce domain. This allows us to call the Lightning Aura Component and access the LWC through it.
- Line 4 is the empty div with an id parameter set so we can use it in the Javascript.
- Line 8 inside a script tag calls $Lighting.use to connect the Aura Component.
- Line 10 inside the function called for the Aura Component calls the $Lightning.createComponent with several parameters:
- c:campaignContactsView : our LWC set as a dependency in the Aura app.
- {name….} : variables that can be passed to the LWC in the @api decorator.
- lightningContainer : the Id of the div tag that we are going to populate with the return from the LWC.
- function : this allows us to run other things on success if we needed to. I just set a console log.
- And that’s it. Pretty clean actually.
Home Page Component
CampaignContactsView

Since we are dealing with the Classic version of Salesforce we are using the Home Page to show the results. One way to do this is by using a Home Page Component that calls our CampaignContactsViewContainer visualforce page.
We just add that to the Home Page for the right users and we are all set.
How it looks
Wrap up
I hope this has been helpful. I’m looking forward to any feedback and improvements I can make. I’ve included some resources below that might be helpful including the complete code files.
Wait… Our PM just walked into the room… Oh, the business loves it. Awesome.
What, they want to change it? Why? (always ask why… usually several times)
They want sort options??? and they want to clear the list as they work through it?
It sounds like another post to me. See you in a few. Got to go write some updates.
Resources:
 VS Code